AstroDSLR overview

AstroDSLR is along with AstroImager, AstroTelescope and AstroGuider part of powerful, but still easy to use astrophotography suite for Apple Mac computers built around INDIGO and INDI standard. Even if they can be used separately, they are meant to work together and with other astronomy and astrophotography tools for macOS or iOS provided by CloudMakers, like INDIGO Server for macOS, INDIGO Control Panel, FITS Preview, iINDI or NightSky Toolbox.
Specific purpose of AstroDSLR is to control digital single-lens reflect camera (or actually any other supported digital camera) and its lens or external focuser, to allow proper framing, focusing and capturing from single batch of images to quite complicated series of images with different parameters and settings. It is actually special version of AstroImager for DSLR cameras.
It can control many devices supported by built-in INDIGO drivers or it can use any 3rd party remote INDIGO or INDI driver. Out-of-the-box it contains INDIGO drivers for the following focusers:
- PTP-over-USB CCD driver for Canon, Nikon and Sony Alpha cameras,
- CCD and focuser simulator drivers,
- ZWO ASI focuser driver,
- FLI focuser driver,
- Shoestring FCUSB and DSUSB drivers,
- Focuser USB v3 driver,
- WeMacro Rail USB driver,
- MJKZZ macro rail USB driver,
- RigelSys nSTEP and nFOCUS drives,
- MoonLite focuser driver,
- Optec focuser driver (untested),
- LakesideAstro focuser driver (untested),
- Deep Sky Dad AF1, AF2 and AF3 focuser driver,
- Baader Planetarium SteelDrive II focuser driver,
- AstroGadget FocusDreamPro focuser driver,
- RoboFocus focuser driver,
- MyPro2 focuser driver,
- Lunatico Limpet/Armadillo/Platypus Focuser driver,
- PlaneWave/Celestron focuser driver,
- RTS-on-COM shutter driver,
- Interactive Astronomy SkyAlert driver.
Newer EOS cameras with Wi-Fi support don't work over USB/PTP unless Wi-Fi is turned off!
What's new in version 3.16
- INDIGO framework updated to 2.0.144,
- Interactive Astronomy SkyAlert driver added.
What's new in version 3.15
- INDIGO framework updated to 2.0.136,
- Application integration bug fixed,
- RoboFocus focuser driver added,
- RainbowAstro mount driver added,
- MyPro2 focuser driver added.
What's new in version 3.14
- INDIGO framework updated to 2.0.124.
What's new in version 3.13
- INDIGO framework updated to 2.0.114.
What's new in version 3.12
- ICA driver replaced by PTP-over-USB driver,
- Deep Sky Dad AF1/AF2 focuser driver added,
- Baader Planetarium SteelDrive II focuser driver added,
- Unihedron SQM sky quality meter driver added,
- Artesky flatbox driver added,
- Pegasus Astro FlatMaster driver added,
- USB devpoint driver added,
- INDIGO framework updated to 2.0.108.
What's new in version 3.11
- INDIGO framework updated to 2.0.88.
What's new in version 3.10
- dashboard/control panel widget for guiding stats added,
- INDIGO framework updated to 2.0.87.
What's new in version 3.9
- INDIGO framework updated to 2.0.85,
- new embedded control panel,
- ZWO ASI focuser added.
What's new in version 3.8
- INDIGO framework updated to 2.0.76,
- support for remote shutter release added (DSUSB, "RTS-on-COM", etc),
- compression mode list for Nikon D5, D500, D7500 and later fixed.
What's new in version 3.7
- Start-up bug fixed.
What's new in version 3.6
- INDIGO framework updated to 2.0.75,
- different ISO, aperture and shutter control for Sony cameras,
- auxiliary device panel added,
- PegasusAstro Ultimate Powerbox driver added,
- more Mojave dark appearance cleanup.
What's new in version 3.5
- INDIGO framework updated to 2.0.74,
- Microtouch, Moonlite, NFocus/NStep, WeMacro and MJKZZ focuser driver added,
- Mojave dark appearance support added.
What's new in version 3.4
- INDIGO framework updated to 2.0.73,
- WeMacro focuser added,
- LiveView with non-zero time lapse value fixed,
What's new in version 3.3
- INDIGO framework updated to 2.0.70,
- Bulb mode issue with Canon cameras fixed,
- LiveView for some Sony Alpha cameras added,
- LiveView for Nikon D3 and D300 fixed,
- list of manually added INDIGO services is persistent now.
What's new in version 3.2
To see a new video tutorial, please visit https://youtu.be/qCuZI-e5nE8
- INDIGO framework updated to 2.0.67,
- specific support for D850 added,
- burst mode support added (experimental feature).
What's new in version 3.1
- INDIGO framework updated to 2.0.65,
- built-in INDIGO control panel.
Please note, that AstroDSLR contains many INDIGO drivers, but none of them with exception of ICA driver is loaded by default. To enable the driver you actually need, select it on Preferences → INDIGO Drivers pane. You may need to scroll down to find some of them.
Initial setup and preferences

When AstroDSLR is started for the first time or when button in toolbar is clicked, preferences panel is shown. It has four different panes. On the first one there are general settings and the rest is related to INDIGO framework.
Many options, e.g. Use LiveView..., Use burst mode..., Use mirror lockup or Avoid AF... works only with certain cameras or lens. Use dithering... and Suspend guiding... options affect only communication with AstroGuider application, otherwise are ignored. Aperture and Focal length values are used only by Bahtinov Mask Helper, otherwise are ignored.
Port number, Bonjour service name and Bonjour service type are parameters for configuration of internal INDIGO server. Do not change them unless you understand how INDIGO works. If something will go wrong you can try to set Log level to debug or trace to see more verbose output from INDIGO framework.
AstroDSLR contains many INDIGO drivers, but none of them is loaded by default. To enable the driver you actually need, select it on INDIGO Drivers pane.
AstroDSLR will connect to any INDIGO server in the local network automatically, but if you want to configure connection to a service without Bonjour support (e.g. linux based INDI server or INDIGO server outside local network), you can do it on INDIGO Services pane.
Camera panel, operations and state

On the camera panel you can select an active camera and configure parameters for its driver:
- frame type,
- camera mode,
- image size,
- compression,
- drive mode,
- ISO sensitivity,
- exposure compensation,
- metering mode,
- focusing mode,
- white balance setting,
- aperture,
- shutter and
- duration for BULB mode.
Frame type is optionally encoded into image name and also into FITS metadata, otherwise is not used.
Not every parameter can be configured for every camera and not every parameter can be configured from the camera panel (e.g. advanced or device specific parameters). For these parameters you need to use INDIGO or INDI control panel instead while AstroDSLR is running and device is connected. Make sure that you saved the configuration before closing control panel (configuration control property in main group).
The camera related operations represented by the toolbar buttons are:
- capture and display single frame,
- capture and display frames in endless loop,
- toggle zoom in preview,
- capture and save batch of images (it will ask to select the folder first) and
- stop all captures.
The buttons are enabled only if camera is selected. Whether to use LiveView for preview or capture can be configured in Preferences.
In the status bar there are two groups of indicators related to the active camera. The first one, in the middle, shows remaining time of capture or timelapse and a current FPS. The second one, on the right, shows current current temperature and battery status.
Focuser panel, operations and state

On the focuser panel you can select an active lens or focuser and configure parameters for its driver:
- focuser speed,
- step size,
- backlash and
- initial and step final for autofocus routine.
Variable speed is not supported by all focusers and also step size meaning may differ. For focusers with stepper motor it is number of steps while for focusers with DC motors it is duration in milliseconds.
The focuser related operations represented by the toolbar buttons are:
- focus in,
- autofocus,
- focus out and
- stop focuser.
If step size is greater than zero, focuser is in stepper mode and will move in or out specified number of steps or milliseconds every time focus in or focus out button is clicked. If step size is equal to zero, focuser is in timed mode and will move in or out while focus in or focus out button is pressed. Timed mode is not supported by all focusers and lens.
Autofocus is enabled only if camera captures frames in endless loop and if star is selected. Autofocus routine tries to focus in and out until quality of focus based on FWHM, HFD and peak value of selected star improves. It starts with initial step size and every time it switches the direction, it reduces step size to 1/2 of current value and continues until it reaches final step size.
In the status bar there is an indicator which shows the current position and temperature if they are reported by the focuser.
With Nikon and Canon camera bodies it is possible to control some of the lens. Nevertheless, that possibility differes from camera to camera. You can focus only during LiveView and if you want avoid AF before subsequent capture, make sure that Avoid AF before capture is selected in Preferences for Canon and that Focusing is set to M for Nikon (unfortunately, this is not possible for semi-profi and profi bodies with AF switch).
Batch panel, operations and state
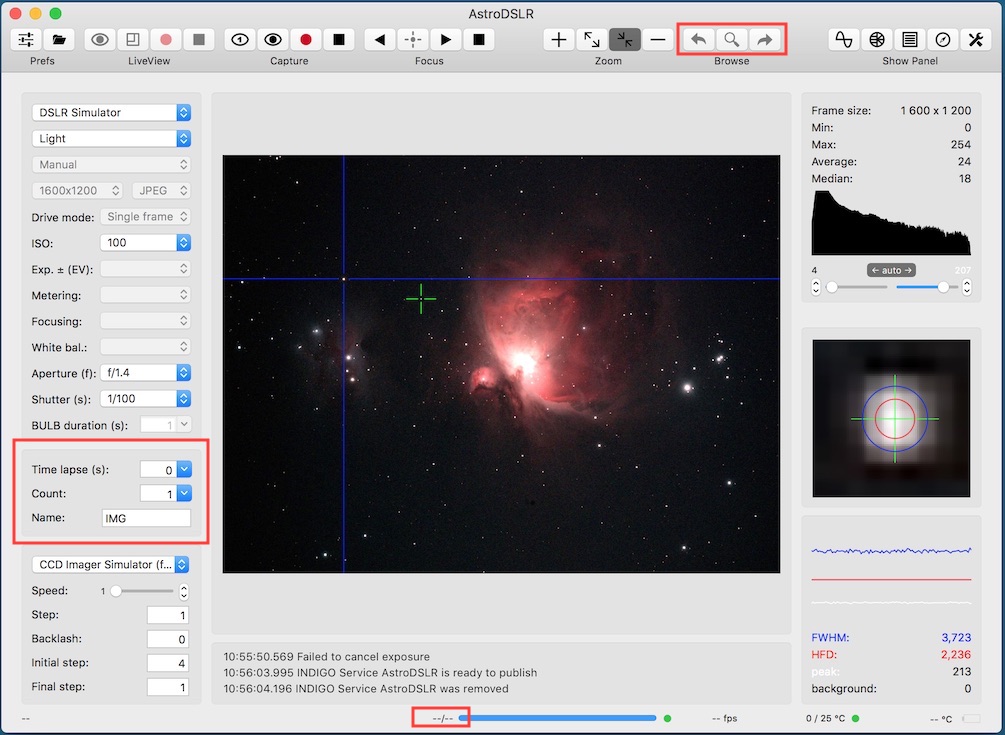
On the batch panel you can configure parameters for capture of simple series of images:
- timelapse between shots,
- frame count and
- base image file name.
Depending on preference settins the duration or frame type can be encoded into file name. AstroDSLR never overwrites existing file, instead sequence number is increased.
The batch related operations represented by the toolbar buttons are:
- previous image in the batch (it will load previous image into preview panel),
- show in finder and
- next image in the batch (it will load next image into preview panel).
Image, histogram, detail and PSF panels

The image preview panel shows the last image captured by the camera, image loaded by previous or next image in the batch operation or image loaded by View → Load image... operation.
If you move the mouse cursor over the image, coordinates and RGB values are shown in status bar.
If you click the position in the image, the nearest star is found and selected (marked by the green cross). This position is also used to display enlarged detail of the image, for PSF (point spread function) approximations and drift measurement.
In the histogram panel (top right) you can see among histogram in logarithmic scale, size of the image and some statistical data. Below the histogram there are sliders and steppers for setting black and white point for image stretching and also button to set the component into automatic mode.
In the image detail panel (middle right) there is magnified surrounding of the star selected in the image preview panel. Green cross marks the computed centroid, blue circle FWHM (full width at half maximum) and red circle HFD (half-flux diameter) of the selected star.
In the PSF panel there are graphs of changes of FWHM, HFD, peak and background values and also their current values.
The image preview related operations represented by toolbar buttons are
- zoom in,
- zoom to full size,
- zoom to fit and
- zoom out.
Other operations related to preview panel and available from view menu are load image, show/hide crosshair reticle, set/remove guide lines #1 and set/remove guide lines #2. To set/remove guide lines select or deselect (by right mouse click) star and select operation from the menu. The setting is persistent, so you can use it to align current view with some another image.
Drift measurement helper panel
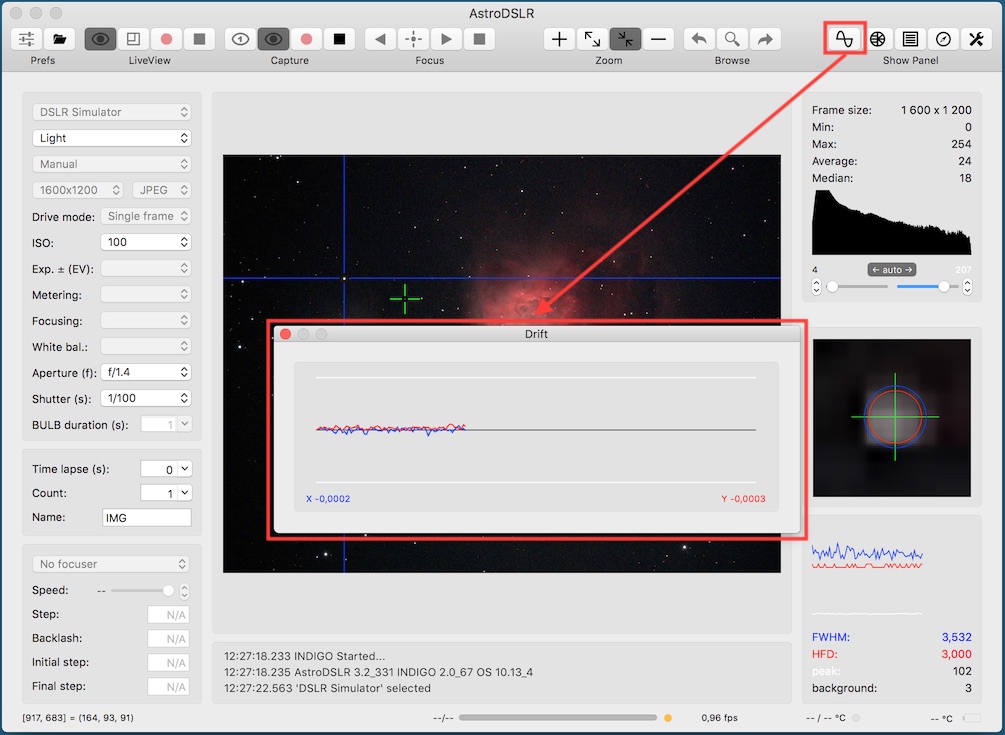
For polar alignment by the drift method or for the validation of the guiding you can use drift measurement helper panel.
The scale of the graph is adjusted automatically. Blue curve represents drift in X and red curve in Y direction. Blue value in lower left corner is drift per image in X direction and red value in lower right corner is drift per image in Y direction.
To use the panel for polar alignment, rotate camera (to align RA/Dec axes along X/Y directions), start preview in endless loop, select accordingly bright star and use drift method.
Please note, that the graph is cleared every time you select the star in the preview image.
Bahtinov focusing helper panel
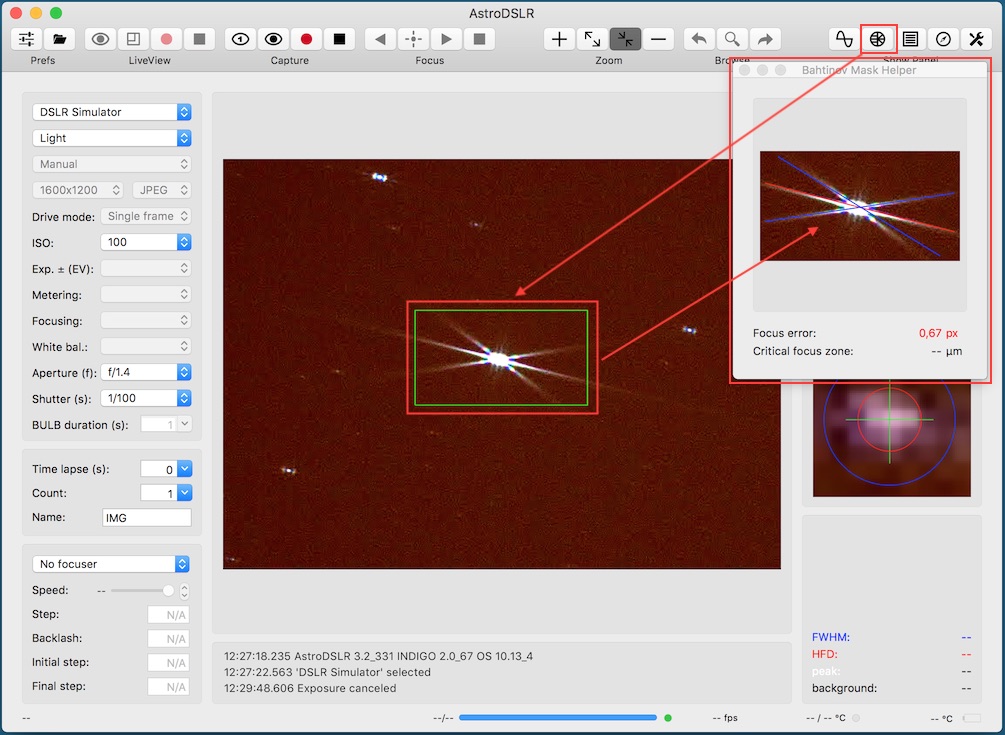
AstroDSLR can help you to focus faster and more reliably with Bahtinov mask focusing aid.
To use it just point your telescope to some bright star, put the mask on, open helper panel and select rectangle by the mouse over the captured image in preview panel to center the diffraction pattern in the panel view. Once centered, two blue and one red (not properly focused) or green (properly focused) line will appear and show the intersection of diffraction spikes.
Telescope is properly focused when the focus error is within critical focus zone. Due to limitation of the line detection algorithm make sure, that each diffraction spike is always crossing the opposite sides of the frame.
Please note, that telescope focal length and aperture needs to be set in preferences to calculate the focus error and the critical focus zone.
Sequencer panel
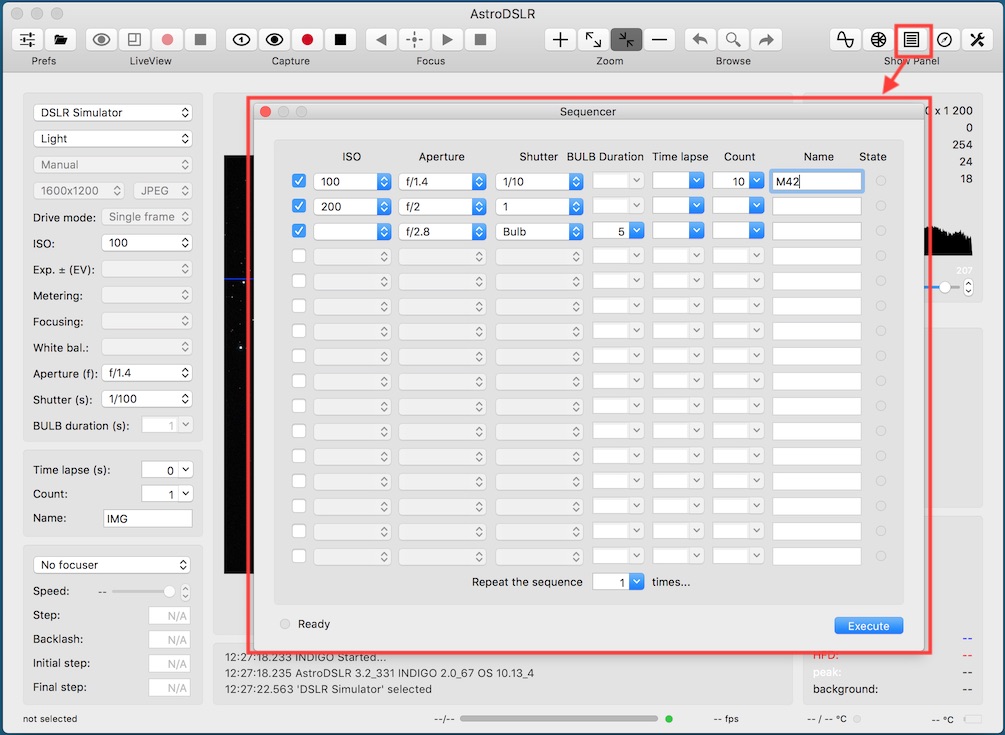
AstroDSLR can be used to capture sophisticated sequences of images, each batch with different ISO, aperture, shutter BULBduration, time lapse time, image count and base file name.
To use it, open Sequencer panel enter required parameters (or leave them empty for use the values from the previous batch or current settings, only selected lines of the table will be used) and click Execute button.
Sequence execution will continue in the background even if panel is hidden until finished or aborted.
Plate solver panel
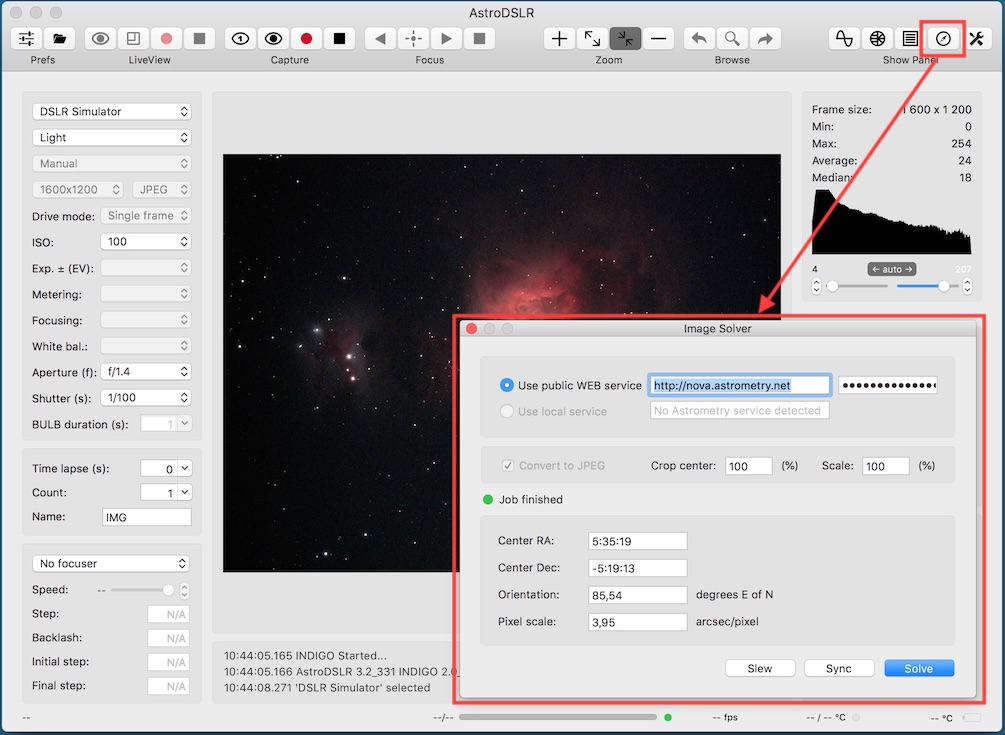
AstroDSLR uses astrometry.net package for the plate solving. You can use either the public one on the http://nova.astrometry.net over web services (the easy but quite slow way) or your private installation of Astrometry for OS X (GUI and web service wrapper around OS X astrometry.net port is available from our web).
Use local service option is available only if Astrometry for OS X is installed and running. Make sure, that you have correct indexes downloaded for your imaging setup resolution.
To use public service, open Image solver panel by clicking Solve toolbar button while some image preview is shown. Enter the service URL (e.g. http://nova.astrometry.net) and API key (both are remembered and need not to be entered every time) and click Solve button. If your API key is successfully authenticated, image is uploaded and solving job successfully finished, the lower four fields contains RA and Dec coordinates of the center of the image, the image orientation and the image pixel scale.
If you are running also AstroTelescope on the same machine or somewhere in the local network, you can use Sync button to sync the telescope mount with the computed image center position.
Plate solving job will continue even if Image solver panel is hidden until aborted.
Please note, that unless you have your own Astrometry for OS X installation, this function uses 3rd party service, needs the Internet connection and its availability is out of our control.
INDIGO control panel
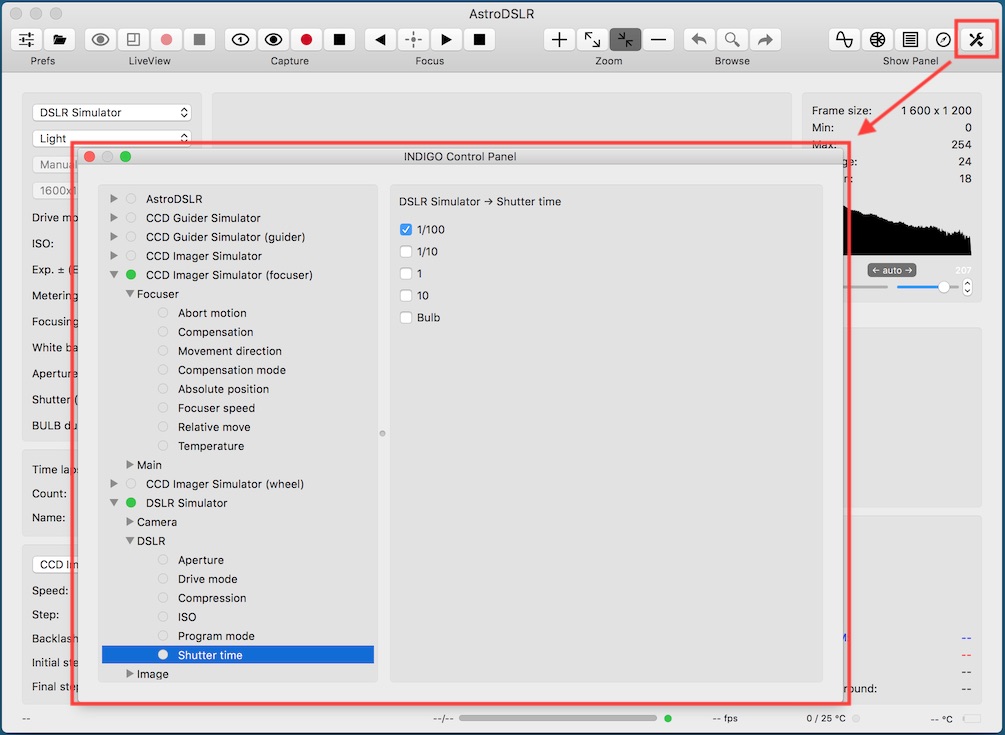
AstroDSLR has a built-in control panel for managing all INDIGO or INDI devices found on the local INDIGO bus. You can expand a device → group → property tree to examine or set items of any device property.
Remember to save your changes each time you customise any settings (navigate to device → Main → Configuration control and click Save)
Distributed setups
As far as AstroDSLR is based on INDIGO, it can natively use distributed setup, e.g. to control device driver running within other application or on another machine. INDIGO uses bonjour service discovery, so you don't need to configure anything while both AstroDSLR and the remote server are running on machines connected to the same local network. Otherwise you need to add hostname and port of INDIGO service to the list at INDIGO Services tab in Preferences.
Typical example of distributed setup is INDIGO server running on RaspberryPI controlling mount and cameras in the observatory or your backyard, while AstroDSLR runs on Mac computer somewhere in warm room. Another example is INDI driver executed by AstroDSLR as external driver (in this case INDI driver itself acts as a server, just communicating over pipes instead of the network).
You can download INDIGO for various linux platforms (including INDIGO server and device drivers) from www.indigo-astronomy.org. If you want to use Mac computer as remote server, you can use INDIGO Server for macOS.
Device detected by remote servers appears in the list of available devices the same way as local device, just with '@ server' suffix in the name (e.g. 'Titan @ rpi.local').
To setup properties of local or remote devices not managed directly by AstroDSLR (e.g. filter names, serial port device names etc.) you can use INDIGO Control Panel. Remember to save the configuration of the device driver (each device has Options section with Configuration page).
Optional INDI driver pack
If your device isn't supported by INDIGO, but has INDI driver ported to Mac computers, you can use it with optional INDI driver pack. These drivers can’t be bundled with AstroDSLR due to GPL license, but you can download and install them yourself.
Source code of these drivers is available from INDI github repository.
Debugging the application
AstroDSLR has a built-in debugging support for case that something went wrong. On AstroDSLR → Preferences → INDIGO set "log level" to "trace", restart AstroDSLR, repeat failed operation, save the log to a text file by Control → Save log and send the file to info@cloudmakers.eu for further analysis.
Further questions?
Please contact us at info@cloudmakers.eu or bb.cloudmakers.eu.